Showing posts with label mady by daddy. Show all posts

Saturday, 20 July 2013

Retro bag just for me


My grandmum had these very funky outdoor chairs when I was still living in Finland and I then already told her that when those chairs broke I would want the fabric from them. And now after few years, that fabric was waiting for me there and the chairs had a new coat of more modern material.


I was holding the material in my hands, thinking of what I should make of it. I have so many fabrics at home that I haven't made into anything because they are too precious, I didn't want this to join that pile. Then my dear husband came and said he wanted to sew something of it for me. Can you imagine!


Thanks hubby, I LOVE my new retro bag! And I don't know how he did it, but I love the size of this bag. I want to make more now with these measurements. It's perfect.


Friday, 31 August 2012

Our COW party!

This year, Emma's birthday party's theme was COW! Yes, cows! Oh I had so many ideas, but only few of them came true. But I didn't stress. I had so much fun crafting and creating. There is lots to share so let's get going shall we.


Invites were cows, of course! The nose of the cow was felt which added that extra specialness in them. It was hubby's idea and I totally want to give him the credit as I thought it was awesome! Not many people have had cow themed birthday parties so as I was thinking of the text I searched a lot of cowboy parties and took some ideas from them.

Because of all last years presents were noisy and flashing plastic toys I had to step in somehow this year. Hense the text at the bottom. I absolutely hate all those type of toys and don't really want them at our house. But how do you tell that to your family and friends? Any ideas?


I admit that I did slip up a bit with her outfit. She looks more like a Grease girl than a cow girl. It's the skirt.. I thought it was very cowgirly when I got the material, but somehow it just doesn't work. I still love the material and the way it turned out, just a bit wrong theme. Oh well, I'm sure we can get many more uses out of it this summer. And it was so easy to make! Yes, easy was the way I went this year.

Couldn't find any boots, but her aunty did her hair which was so pretty and fitting for the occasion. Thank goodness for awesome aunties!

As the guests arrived they were greeted by a line of cowboy scarfs. Everyone got their own. I got 5 different patterns so that they didn't all have the same. All the kids looked so cute with them on and I think my own cowboy was pretty darn handsome too. I made a few bigger ones for us parents.

I also made some buntig to hang around the place. All made from old things like sheets, mens shirts, table cloths and so forth. So very well recycled and it didn't cost me much more than time used for sewing and cutting.


I didn't make it in time to get good shots of our food. That's ok, at least it means that people were enjoying it. I think the coolest thing we did this year, concerning food, was our milkshake bottles. And of course that's the one thing I didn't get any pictures of, so I'll explain. We had a white metal bucket (you can see it in the furtherest corner of the table) filled with ice and full of glass bottles that had milkshakes in them. Flavours were chocolate, strawberry and spearmint. Oh it looked so cool and tasted even cooler! It was a massive hit.

My favorite food was the frozen banana pops, so yummy! We are going to make them all summer long. I also made little custard jars for everyone, and instead of a one big cake we had lots of cupcakes. On top of Emma's cupcake there was a cow with two candles on it. One of those silly ideas of mine according to husband, but yet he kindly did what I asked and I think it was groovy.

Loved the food! I put the most effort in it and it was gooood. Three different types of vegetarian pizzas, quishes, coctail sticks, home made dips, milkshakes...


We didn't have many games since all the kids were aged 3months to 3 years, but I did want some sort of activity. Photo wall was the answer! It was a massive hit, so much fun and guess what, so easy to make! We just got a big cardboard box (this one used to have a washing mashine in it), I drew some cows on it and then painted over. Then hubby cut the holes for the heads and ta da!

Notice the chicken who wanted to be a cow. Or then it was just trying to get away from the dog. I kept the heads that were cut off so that when there were three or two people getting in the photo, the extra cows were made to look like cows. I love this picture of the three little cousins, all doing their own thing.


For a party favour, all the kids got this little bag that had a small chocolate milk and a set of farm animal stickers in it. I didn't want to give any candy to the little children so that's all I could come up with. And hey, they got their scarfs too!


Oh what a happy day it was! I felt so blessed that we have so many wonderful people in our lives who care about Emma. Many came from over 2 hours away just to celebrate with her and that means so much to us. She was the happiest little girl I have ever seen and she fell asleep in my arms at 5.30pm. It really took all her energy. I think it was a perfect day!


Friday, 27 July 2012

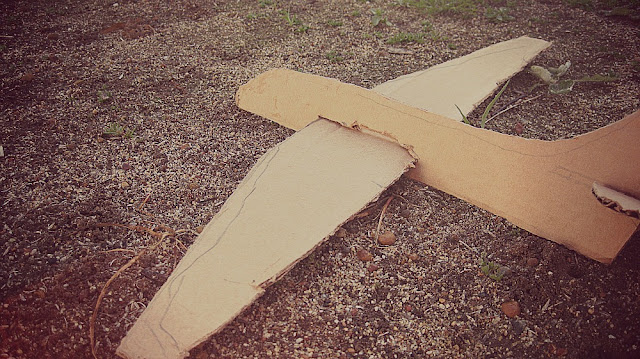
Cardboard plane


True cardboard fun! We got a load of cardboard (which we needed for a future project) and with the left overs daddy made this airplane for Emma. I'd say they are both a bit fanatic over planes, quite cute. It must run in the genes. But shows you again that you don't need much to keep one toddler occupied and happy. Thanks daddy!

Wishing you all a great weekend!


Monday, 2 January 2012

Spoon full of herb

I have to show something I made for Christmas presents. I couldn't show them before Christmas for obvious reasons and I was in too much of a hurry to get good pictures, so my appologies for that.


I got the idea somewhere in the internet. I'm sure you've seen them before. Had hubby helping me to do the letters and I did the rest. I thought they are so adorable that I want these for my herb pots too.

Thursday, 10 November 2011

Hard work pays off


Wow, I was asked to do a wedding present for a couple who loves splities and even has one (the car in the picture). The budget was rather low hence the t-towels. But I wanted to make it somehow special.

It is by far the most difficult thing I have ever hand printed, especially the vw logo. But it is also the first crafty thing I've been paid for.


Husband also made them these forks. I got the idea somewhere, but I can't remember where I've seen them. I tried it but it turned out to be too difficult for me to master. Lucky that husband of mine has skills to handle metal. So you could say that these are hand printed too!


Saturday, 17 September 2011

Our new pimpin ride

I FOUND THE CORD! Well actually all I had to do was to ask my hubby who reminded me where it was. (If you don't have any idea of what I'm talking about go back and check this post.)

Now I can present you our new family member. My awesome hubby went to the tip while I was in Finland with Emma and got this bike. He restored it and painted it. Got new parts and made it shiny. Do I need to say more, I love it!


When we got home, we went to buy some helmets and a seat for Emma. Now we are the coolest chicks in town cruising everywhere with out brand new ride. Pictures are from our first ride with Emma. She loves the bike as much as I do.


Australians are very different to Finns when it comes to riding. In Finland almost everyone has a bike and most of them actually use it. In here it's different. Australian's like their cars and go everywhere with them. I have felt ridiculous going to town with the car when it's only few minutes away. So I'm very very happy now that I get to go with the bike. I still use the car when I have to go food shopping but everywhere else I trust that the bike will transport us there.

Thank you so much husband (who's going to be a cop by the way!!!).


Thursday, 15 September 2011

It's only a sneak peek

Do you ever feel full of inspiration and you want to do everything right at that second and then something happens and you can't? (And then other days you can't find inspiration anywhere...) I am having that sort of day, the full of inspiration one and yet nothing seems to work out.

I would have liked to show you this project:


...but I can't finish it because I can't find my piece of felt anywhere.


I also would have wanted to tell you about this:


...but I cannot find the cord anywhere so that I could get certain pictures out of my phone.

So do I give up? Usually I would, but today is say NO. I will go back out there and search for my missing items. And that's why this is just a little sneak peek of what you'll be seeing in a (hopefully short) while. And next time when you feel like giving up, because it's just not your day, say NO and keep pushing. Make it your day, because only you can! Even on days like these:


Yeah this 'not giving up' thing is probably more to myself than to any of you. But I'm hoping you're all having a wonderful day!

Wednesday, 31 August 2011

DIY Chalkboard (easy tutorial and quick too if I may add)

You probably saw that in the previous post and I wanted to show you how we did it, because it was so so easy and quick!

It all started when I went to buy some material in Perth and green chalkboard paint was on sale. Then this happened:

Yeah I got home and drew this for my hubby. Bunnings on that piece of paper means the shop where I thought we would get all this stuff that we needed. Turns out I was right and in we went. It also turned out that during our shopping spree we realized that it would have been cheaper to buy one than make one, eg. ikea had one for less than $20 if I remember correctly. So I had to sell my idea and reasons why to make it ourselves for my husband (and I'll do it to you too incase you're thinking like my husband).

When you make things yourself, you put special meaning in it at the same time. I believe that my daughter will value things (in this case the chalkboard) much more when she knows that her father has made it thinking of her. And I think you can't really put a prise on that sentimental value. So sometimes even if it was cheaper to buy it, make it yourself. It means much more that way.

So now that you agree with me and want to make it yourself too (even though you might get it cheaper from ikea) here's a list of things that you need (or what we used):
  • chalkboard paint
  • paint brush
  • board (we used 900mm x 600mm x 3mm board that we cut in half so two board pieces ended up being 600mm x 450mm)
  • timber for the sides (we had 3 pieces of 1800mm x 40mm x 20mm timber that we cut into the parts we needed)
  • a saw and a hammer and a drill
  • nails
  • 2 hinges with screws (8 screws)
  • sandpaper
You can use different measurements if you wish to, this is just how we did it. And I'm sorry about the darkness in the photos, we did it after Emma went to bed. But it sure was a quick project!

Here's to how to:

Cut the board in two (600mm x 450mm) pieces and paint them with the chalkboard paint of your choise. Cut also the parts for the sides (4 long ones and 4 short ones). We used 1800mm x 40mm x 20mm timber (we had 3 pieces of them) so the long parts ended up being 900mm and the short ones 370mm.


 After the paint has dried it's time to put it together. Make the two sides of the chalkboard separate first. You'll need your nails and hammer for this part. We used 2cm long nails.


Next you drill small holes where the hinges go and screw the hinges to place attaching the two sides together. You should also sand the sides and corners so it looks great and your little ones won't get any sticks on their hands


 And ta da you're DONE! FINISHED! and ready to draw.


Note: Doesn't work too well with a one year old yet because they still put everything in their mouth and don't get the drift of drawing yet. But we tried it anyway:

Related Posts with Thumbnails