Showing posts with label textile printing. Show all posts

Monday, 27 May 2013

Little dinosaur boy


We were very fortunate to be able to go up to Perth on Saturday and celebrate Casey's 1st birthday. He is the most gorgeous little boy, as cute as they make them. And when his mother wrote on his birthday how lucky she is to have such a beautiful, happy, loving, caring little mr mischief, I knew exactly what to make for him.

I saw a while ago this text: ROAR, that means I love you in dinosaur. I think it fits with so many little boys. All the loudness and mischief, all the energy they have and trouble they get in to... all a way to get our attention and to tell us that they love us.

I haven't drawn in a long time and I feel it's definately not one of my skills, but I had a lot of fun trying to draw this little boy inside the dinosaur outfit. And now I'm planning on drawing some more, I got so excited. What do you think? I also put the orange dinosaur beanie with the gift to match the t-shirt.


Saturday, 4 May 2013

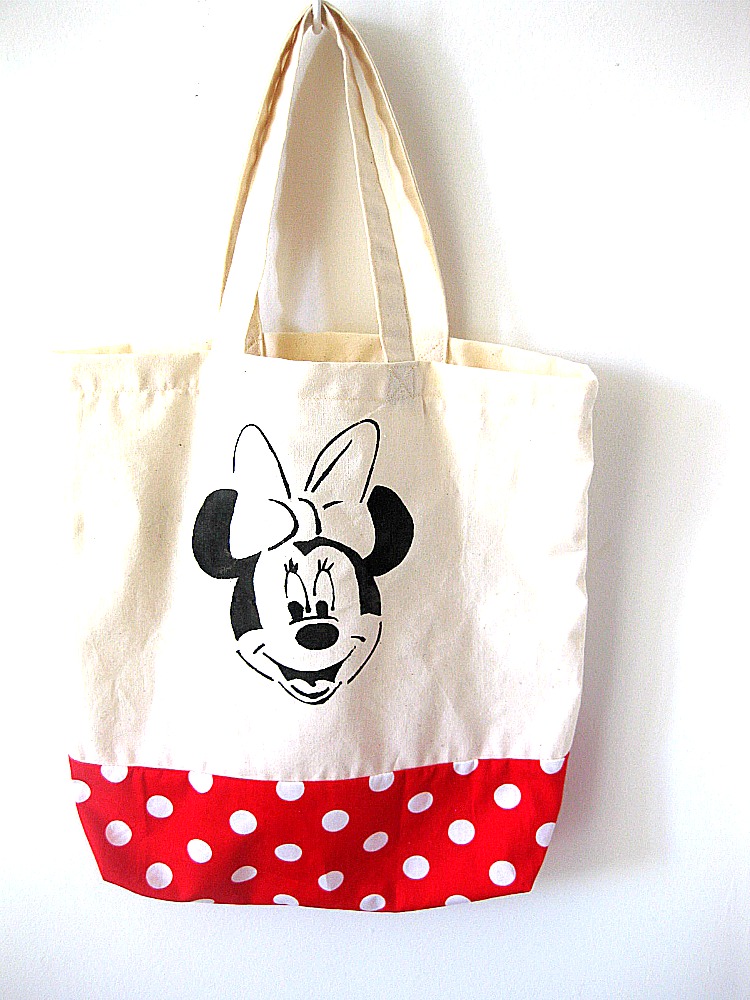
Minnie Mouse present


Emma's cousin Mia turned 3 last week. Oh my how time has gone fast. That means that it's less than 4 months and Emma herself will turn 3 (Better start planning her party.. Just kidding, it's almost sorted already). But for Mia, I made a little Minnie Mouse bag and a Minnie Mouse mask. Cuteness. Emma was more than happy to be my model and try on the mask before we wrapped the present up.


 Poor thing would have wanted to keep the Minnie Mouse mask to herself. So it got me excited. I think it's time to make some more masks. The FARM ANIMAL ones have been really popular and now I've been drawing patterns for other sets.

I'm thinking jungle animals: monkey, lion, giraffe, zebra and elephant. Also maybe little garden bugs: butterfly, spider, caterpillar, ladybird. I only have 4 bugs in that list, but I'd want the set to always have 5 different things. So any suggestions of what would be a good bug to that list?

Tuesday, 27 November 2012

Movember and my little moustache man


Few more days left of Movember and I think it's time to show our moustaches that we've been growing all month long. Here's my little man's moustache. It truly has been in the making for the whole month. In the beginning of the month I cut the pieces for the onesie, then the second week I was able to make the stencil and print the moustache. Third week I sew the neckline and the sleeves and yesterday I was able to finish it off. For some reason making things seems to take a long time at the moment. But he looks pretty handsome with his moustache if I may say so.


Oh how he grows, he's even smiling now!

Saturday, 6 October 2012

From big sister to little brother

How do you prepare your first born for a sibling? I've heard horror stories, but also stories full of love for the new baby. I wanted Emma to be as ready as possible. The whole pregnancy, we tried to talk to Emma about this new baby that was going to join our family. We put her in her big girls bed and after she was used to it, told her that the new baby was going to sleep in the cot. We went through all the tiny clothes together and she helped me put them in the drawers. She got her own baby for her birthday that she has practised putting a nappy on and practised comforting a baby and putting it to sleep. (Don't stress, she won't be doing these for her brother, but she does know now what you do with a tiny baby). Of course we've also talked about the belly and how the baby is there, she has talked to the belly and blown raspberries.

All these things have prepared her very well, but I wanted to do something else. Something that would be totally from her to her new baby brother. So she could give him a gift and show how much she loves him.


Rattle was a perfect gift I thought. She got to paint as much as she wanted (fabric paint). She chose orange and I chose yellow to go with it, as I'm not a big fan of orange. Then when she was finished painting, I looked at the pieces and saw a lion. Yes I stepped in a bit and drew a sleepy lion on the other side and awake lion on the other. She didn't mind.


The little man couldn't care much for his new rattle yet, but it was very important for the big sister to give him his new toy. 

Tuesday, 18 September 2012

Crafty shower

 
I'm so lucky, I have such an amazing sister-in-law. She threw me a crafty baby shower, just my kind of thing. And the best part was that she let me be a bit bossy and say what things I wanted to do. In fact she let me organize all the crafties.


I had to think of a crafty activity that would be easy for everyone to make, even if they thought they weren't crafty at all. So I made these origami stencils using THIS free font. Everyone got to choose which one they wanted to make and what colour they wanted to use. The onesies were all the plain secondhand ones that I've been given.


I thought they turned out amazing! I love them all and can't wait to dress our little one in these. Hopefully he/she will fit into some of these as some of them seemed so so tiny. I love the bear and the elephant and the birds, oh I love all of them!


And it wasn't just my darling friends who got involved.. After all the stencils were used, I had an onesie left so one of the guys wanted to draw a little something for the little one. How cute is this little chick onesie.


Thanks Shelley, you truly are the best! And thank you all my lovely ladies who stepped out of their comfort zone for me and did something crafty. I am so ready now to have this little baby. Oh no I'm not actually.. I still don't have any pants for the little one. I shall do them next.

Wednesday, 29 August 2012

Little miss quilt

August means only one thing for me. It means birthday planning for our little girl and then the actual event in the end of the month. So that is what I have been up to for the last month. My friends say I go far and beyond over her birthdays, but I don't care. I really had fun this year planning Emma's party.


But I'm not going to share anything to do with this years party yet. No, first we have to go back to last years celebration! Do you remember what we did last year? We had a little miss theme that you can read more about HERE. And as I was thinking of ideas for this year, I realised that I haven't shown you guys the most exciting thing we did on her birthday last year. The quilt!


I wanted Emma to have some sort of memory of her first birthday and for some reason a quilt came into my mind. So I made these squares and printed different little miss characters on them. I made my own stencils and wrote the name of the character underneath the little miss. Then I took a few with me to Finland when we went for a visit in July 2011. That way my family and some friends got to also write a little message for Emma.

On the actual day all the guests got to write little something for her. Then it was pretty simple, I just sewed them together and finished the quilt. On the other side I just printed one row of little miss sunshines. This is my first ever quilt and I realised that binding is not my thing. Or I don't have any idea of how to do it. Next time I might look for some instructions. But hopefully after many years Emma will read these messages and feel the love out of them (and won't mind about the binding).


Above some of my favorite squares. Emma's aunty Suvi and uncle Lassi got super creative and made a song for her. Her grandpa in Finland made a nice poem for her and then her two cousins on different continents drew very nice pictures. Warms my heart when ever I see this quilt.

Friday, 17 August 2012

Disney nostalgia


I'm not too into any of this character stuff that is going around in the stores, but we do have couple of lovely little girls in our lives who love Minnie Mouse. The other one of them just turned 3 and I had to make something Minnie for her. And the other little girl will get her bag a bit later.

Truth is, I was only going to make one bag, but I wasn't happy with the first one, so I made another one. Works great as I now have one present made in advance, and that never happens. I also bought some books to put inside as I thought these bags would work great as library bags.

You can find the stencil HERE. I just drew the image on a clear sheet and cut it out with nail scissors. I made two different sizes.


Then on the morning of the birthday, I went to our local small op shop. Looking for something totally different, I came across with this old memory game. It was in such a good condition, had all the pieces, and lets face it, it just went so well with the bag, don't you agree! $2 later I was on my way home with a big victory smile on my face. I gave it a good clean and wrapped it. Oh I do have to admit that before wrapping, we did have a game with Emma. Oh the flow of nostalgia, all these images from my childhood. It ended up being a bit hard to let it go and give it away.

Thursday, 19 July 2012

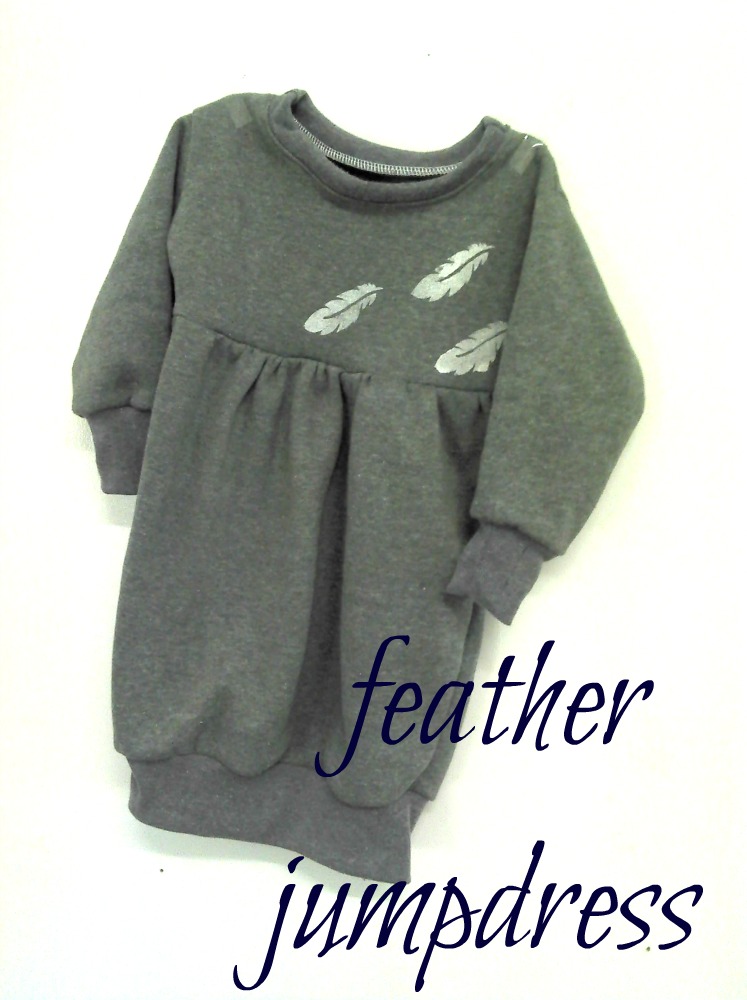
Her feather jumpdress


I'd say it's a jumper, but my darling daughter insists that it's a dress. So we'll call it a jumpdress.

I had a vision of it in my head a long time ago and I've just been lacking the execution. Lucky I got the motivation before this winter is over and now she can be fashionably warm. No patterns used here, just my own imagination and one of her basic jumpers to help me get the size right. I am very happy with how it turned out and the feathers just bring a little extra to it.


Little girls really need something long to wear so that you can't see their back flashing while they are playing and having fun.

Monday, 9 July 2012

Stamping away


Carved myself a stamp, I did. Dreaming of going away somewhere. Maybe this weekend I will get on that hot air balloon and see where it takes me. Hopefully somewhere magical. And green. I don't even mind if it's raining.


Tried it on some material, but it didn't work. Maybe it's the rubber, maybe me.


So instead I decided to use it in something else. What's that, you say? Well another project that I will share very very soon.

Tuesday, 12 June 2012

For another butterfly girl and a way to keep your hands clean while eating


Dear Matilda, who is such a ray of sunshine and one of Emma's besties, turned one. I made the birthday girl a butterfly shirt (just like Emma's, as seen here) and a girly beanie. Very fitting for a garden themed party.

We had so much fun at the birthday party. So many toys, so many friends and most of all so much yummy food. Yes this is my darling girl and I have no idea why she was eating the cupcake like that. Maybe to keep her hands clean, maybe to entertain everyone. Who knows what goes on in that girls head.


Tuesday, 5 June 2012

For our family's superhero


Oh my brain. Of course I made something for the new constable. I meant to put it with Emma's shirt, but totally forgot. Oh well here it is, a shirt to remind him that even when he's off duty, he's never really off duty, if you get my drift. I just bought a plain shirt and then used a stencil to get the image and the text on it. You can find the superman stencil here. The letters I just made myself using fonts from microsoft word.

And if you ask me, I'm super happy with it and think it's funky as.

Saturday, 26 May 2012

For my butterfly girl

 
As we were making the hearts (seen in the previous post), Emma kept saying that they were butterflies. I felt bad that we didn't do any butterflies so I wanted to make her something with butterflies in it. I wanted to use the same rain drop shape stamp that we used for the hearts since she obviously saw butterflies then already.

It was also her name day last Saturday so this was also a present for her. Name days are something we celebrate in Finland and I'm all about traditions so of course we are celebrating them here too. I put aside the fact that I'm not a big fan of butterfly shapes and pink and used both of those things in this shirt.


I tried using semi-homemade fabric paint, but haven't tried washing yet, so I have no idea how it'll last. I'll share more info about it when I know if it works.


First of I made the butterflies using a raindrop shape stamp and then the antennas with a paintbrush. I also put one butterfly for each sleeve and at the back. She loves the ones on the sleeves and keeps looking at them. Well she loves the shirt all in all very much which makes me happy.


It looks very springy to me but then again maybe it's just the brightness we need for this cold winter that's ahead of us.

Hope you all have a great weekend. I will have a lot to share again after it's over. 

Wednesday, 23 May 2012

Heart means I love you (a little tutorial)

... or I lylyy as my darling daughter would say.

Yes mothers day has come and gone, but I haven't had any time to share what we made with Emma for the women in our lives. I had a great vision of Emma pressing her fingerprints into heart shapes. So here's our idea that you can do with your kids for any occasion! We are sending these out as birthday presents and Christmas presents too, so not just Mothers day presents. Actually they would be great for Valentines day too (thinking ahead is always a good thing).


Turns out Emma is still a bit too young to make heart shapes with fingers. We did try and managed to do five hearts like that. Then I decided to do a stamp out of a piece of cardboard and that was easier and quicker for her to do. So I've put together a little tutorial of how to make these lovelies.


You get the idea from the pictures, but I've added a few lines of extra insight if you want to read them too.

What you need is:
  • some light coloured material
  • fabric paint
  • a cap of a bottle to draw a circle (and a pencil of course)
  • some felt
  • fray stop (optional)
  • cardboard for a stamp if you want to use a stamp
  • scissors
  • hot glue gun
  • sewing machine
  • safety pins 

First of draw some circles on your material. This helps your child to know where the hearts need to be and will save you a lot of material since they won't be making them randomly all over the place. It'll also help you to cut the hearts out in a circle shape, dah!


If you want to use a stamp instead, you could cut out a heart shape straight away. I wanted to make it a bit more challenging for Emma so I made a rain drop shape and she had to stamp twise to get the heart shape. I did have to help her out with the other half of the heart but it was fun doing it together.

I placed the stamp I made of cardboard on top of a pen with double sided sticky tape.


 Once the hearts are dry, you can just cut out the circles of the material.


You can make a patern for the flowers if you want them all to be the same shape.


My material was fraying a lot so I used a fray stop around the edges of the circle. It's awesome stuff and helps out a lot in small projects like these. After applying fray stop around the edges it was easier to sew the circle on the flower.

Now I know that all you people in Finland won't find fray stop in the shops. I've tried and the sales people haven't had a clue of what I've been talking about. So the best way is to order online if you want some. And in Australia, you can buy these in almost any craft/material shop.

I sewed around the circle twise.


It depends on how old your child is, but obsiously the older they get the more they can do themselves. Cutting the flower, and even sewing is not a problem for older children. But even though my kiddo was only able to do the hearts and even in them she needed help, I'm still writing in the cards that it's made by Emma.

Here's still the ones with the finger print hearts:


 How cute are they! A little piece of love for someone special.


Related Posts with Thumbnails