Showing posts with label accessories. Show all posts

Saturday, 20 July 2013

Retro bag just for me


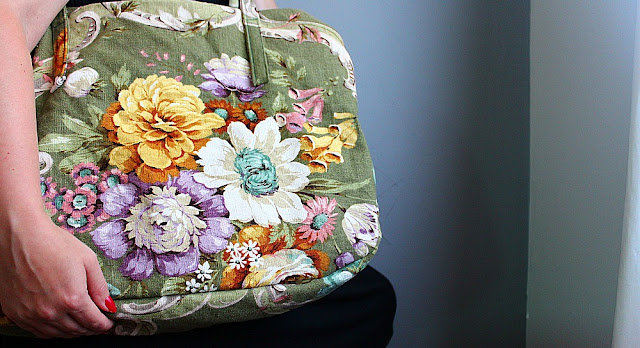
My grandmum had these very funky outdoor chairs when I was still living in Finland and I then already told her that when those chairs broke I would want the fabric from them. And now after few years, that fabric was waiting for me there and the chairs had a new coat of more modern material.


I was holding the material in my hands, thinking of what I should make of it. I have so many fabrics at home that I haven't made into anything because they are too precious, I didn't want this to join that pile. Then my dear husband came and said he wanted to sew something of it for me. Can you imagine!


Thanks hubby, I LOVE my new retro bag! And I don't know how he did it, but I love the size of this bag. I want to make more now with these measurements. It's perfect.


Tuesday, 21 May 2013

Toddler craft // our new necklaces!


Couple of weeks ago I ordered some wooden beads online and I had actually forgotten that I even ordered them, until the mail came today. Emma went nuts over them. She was telling me all the colours and was pleading me to make a necklace for her. Well ok daughter, I thought, but you can do it yourself.

What a super awesome activity to do with your child! It builds their motor skills like no other and you can teach them counting and colours at the same time. So get some wooden beads and some thin round elastic and get creating necklaces.


She didn't have the energy to do a whole necklace full of beads, but I think it actually looks more hip and fresh when there's only few there, and I made the knot at the back so that if she ever wants to continue she can. She put hers on very proudly and then she asked me where mine was. Oh I didn't even think to make one for myself as I was in awe staring at her and amazed of how wonderfully she was doing her own necklace.

Guess what she did next, after she had just told me that she was tired of making hers and that it was finished. Yes she started to make me one. I told her the colours I wanted on mine and she kept picking them and putting them on the elastic. Thank you baby girl for making me a lovely autumn colour necklace.


Now we can match all winter long. Aren't they cool!


Wednesday, 15 May 2013

Groovy bag // the second sewing class


Here's the second school holiday sewing class I did at Victoria's place. I had planned this one for just boys as well and see how many boys got excited about this! Ha, zero, that's right. Oh well the girls didn't mind that the colours I had chosen were a bit boyish, they made the bags look like theirs.


It felt good to be able to teach again and teaching sewing was a lot of fun. The girls learned quickly and I was so impressed with their designs on the bag. I'm thinking more sewing classes, it's so much fun to sew things together and you feel so proud when you've finished something by yourself.


Thursday, 9 May 2013

What rain can do to you.


I'm lying in bed under the warm covers not wanting to get up. Then I start to listen, am I hearing what I think I'm hearing? Is that... I get up and run to the window. Yes it's RAIN! Rain is here, my darling friend rain! My muse, the thing that kicks me in the backside and gets me working, rain. My daughter is outside running around in her pyjamas, no shoes. I call her inside and tell her what a good girl she is. We take her soaking wet pyjamas off and put her clothes on and a rain jacket and gumboots and outside she goes. I go with her, in my woolen socks, I'm not a very good example to her. We're using all of our senses, feeling the rain, listening the rain, tasting the rain and smelling the rain. I try to take a few pictures, but it doesn't work. You just can't capture the beauty of rain with an iPhone. I go inside and I smell something else, something burning. It's a horrible smell. It's our breakfast porridge. All burnt and ruined, I was too overwhealmed by the rain that I forgot the whole porridge. Oh well I thought, open the windows, let the bad smell of burnt porridge go out and welcome in the lovely smell of rain. Now bring out the materials I need to make something.


Beanies; little ones, big ones, girly ones and some for boys. Thank you rain. Do come again.


Monday, 6 May 2013

Dinosaur beanie // Sewing class


When I was asked to plan and run a sewing class for boys I jumped out of joy! What a great idea to have a sewing class for boys!! Victoria's place organises school holiday programs for kids in our town. It's a great way to give kids something to do during the holidays as often the parents are still working.

I was all over this challenge and came up with this dinosaur beanie. It's so groovy and cool. My students were amazingly talented even though it was their first time sewing with a sewing machine. I was proud as punch when I saw their beanies in their heads, and so were they.


 I ended up having only three children and yes one of them was a very brave girl, but it was just perfect amount so I was able to help them along all the time. So talented, so talented! I also did another class, but of that I'll post a bit later. And this class will be running next school holiday as well!


Oh happy Moday everyone! May it be a productive week!

Saturday, 4 May 2013

Minnie Mouse present


Emma's cousin Mia turned 3 last week. Oh my how time has gone fast. That means that it's less than 4 months and Emma herself will turn 3 (Better start planning her party.. Just kidding, it's almost sorted already). But for Mia, I made a little Minnie Mouse bag and a Minnie Mouse mask. Cuteness. Emma was more than happy to be my model and try on the mask before we wrapped the present up.


 Poor thing would have wanted to keep the Minnie Mouse mask to herself. So it got me excited. I think it's time to make some more masks. The FARM ANIMAL ones have been really popular and now I've been drawing patterns for other sets.

I'm thinking jungle animals: monkey, lion, giraffe, zebra and elephant. Also maybe little garden bugs: butterfly, spider, caterpillar, ladybird. I only have 4 bugs in that list, but I'd want the set to always have 5 different things. So any suggestions of what would be a good bug to that list?

Monday, 7 January 2013

My big bag


Yeah BOY, I finally got some inspiration to sew. I found this fabric on the top shelf in one of the cupboards when we moved in. It had been something, yeah something, I have no idea what. But that instance when I saw it, I fell in love with it and wanted to make a big bag out of it. Almost two years later I have done it! It must be the year of miracles. I LOVE it! I just made the handles too long, so I gotta look into fixing that at some stage, maybe in two years time. I have enough materials to make another one too, so I might just do that.

I have lately been doing bets with myself, and I wanted to see how much things I could fit in it. This is how it works: I bet I can't fit shoes for our whole family in that bag. I bet I can't fit all of my kids dublos in that bag. Etc.

Oh yes I can!
Oh yes I can!


Tuesday, 1 January 2013

Urban turban // TUTORIAL


There is no better way to start a new year than by making something really chic for yourself! Hence I started my new year by making a very cool urban turban. I saw the idea somewhere in the internet on a Finnish site that I can't find anymore (if anyone knows where the instructions are, please let me know, so I can give the credit to who it belongs). So it is not my idea, but I will share you the instructions, the original was in Finnish anyway.

Super easy, very quick too and I think it looks darn cute. And the best part, you DON'T need a sewing machine!


1. Cut two pieces out of strechy material. First one will make the turban, second piece will be the rose on it. First measure your head circumference and half that. Fold your strechy material to that measurement. Then measure about 35-40cm up the piece. Start cutting straight up the piece and about half way start curving as in the picture.

The piece that makes the rose can be as long as you want. The longer your piece, the bigger your rose. Mine was about 35cm. Again fold the fabric in half and start cutting so that you are making more narrow all the way to the end. I started at about 8cm and when I finished the width was about 4cm.

2. Make foldings to your turban and hold them down with pins. Notice how I've turned the bottom and left few cm unfolded.


 3. Then take some thread and a needle and sew the foldings. Super easy, just go up and down with yout needle.


 4. Pull so that it gets a bit tighter. You can take the needles out now.


 5. Sew the straight part together at the front. I did all this by hand! Now all you have left is the rose!


6. Take your rose piece and start from the narrow end, sewing the two pieces together, again just up and down with your needle.


7. Pull it tight and you have yourself a rose! You can sew a bit at the bottom so it holds together.


8. Then all you have to do is to attach your rose to the turban and your urban turban is ready to be worn!


Lastly take a picture of yourself and admire how cool and talented you are. Yeah I did that, as you can see. Feeling very chic!

Tuesday, 4 December 2012

Infinity scarfs


It's Christmas present time. I know I'm ruining the surprise to some of my friends now, as these scarfs are nicely wrapped under their trees waiting to be opened on Christmas, sorry.

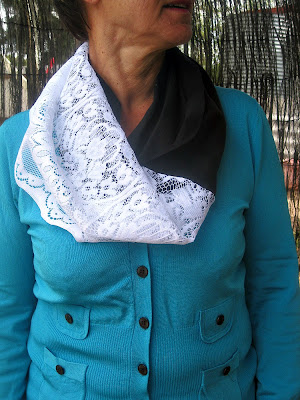
I saw this type of  infinity scarf on pinterest and thought I'd have to give it a try. Then I made one and fell in love. Mum and I got so excited. I made heaps for my friends and mum, after returning home, has made these for her friends too. I miss sewing with her and have to post these things that I was able to make while she was here, as at the moment I'm finding it hard to have time to make anything.


After I wrapped and sent these scarfs in to the world, I still had couple left over. So they are on sale on my facebook page, if you are interested.
Related Posts with Thumbnails