Showing posts with label recycled. Show all posts

Monday, 2 September 2013

Artsy birthday party


 And so she turned 3. I can't believe how time has gone so fast and what an individual she's become. She's been looking forward to this party for months now so I wanted her to enjoy. We had a big artsy birthday bash for her with all her friends there.


 Let's start with the food shall we. We had jelly cups as paint cups, perfect party food for kids party as they absolutely love jelly. The paint brushes were a hit too, you can find the recipe I used from HERE. The crayons gave me most work. I loved the idea though so I had to make them. I got the idea from HERE, but instead of pretzel sticks I used chocolate bisquits and instead of candy melts I used coloured white chocolate. The best part is that you can actually print the labels if you don't feel like making your own. For the printable crayon labels go HERE.

Then I thought we'd have an artsy activity at the treat table, so we made biscuits in different shapes, put just white icing on it and got the kids to decorate them.


I got a bit carried away with decorating the biscuits, but it really was a lot of fun. The bread stick pencils were a bit sad sight, a classic example of what happens when you get a last minute great idea that doesn't work out as well as you saw it in your head.


Just like on her previous birthdays, I wanted to have cupcakes instead of a cake. I think cupcakes work so well with little kids, they are rather easy to eat and they are not very big. Yes the fact that I'm not a very big cake person had something to do with this decision as well. The cupcakes worked great on this occasion and the icing was plenty of messy which was part of the theme.


I made 4 art smocks so that the kids wouldn't get too much paint on themselves. Emma had hers on the whole time where as the other 3 were going around to who ever was having a turn at painting. On Emma's art smock under the picture it says "Allowed to get messy". I realised after the party was finished that I don't have any pictures where you could see that text, what a bummer.


We emptied Emma's room and made that into an art studio. There we had a painting stand, a spot to draw with chalks, playdough and a necklace spot where all the kids were able to make THESE necklaces. Also my amazing sister-in-law painted cute butterflies to all the little cheaks.


Of course we also had to have some funny frames to get funny pictures of our little people, and the big ones as well. All the frames were made of cardboard, so very good recycling and low cost way here.


As a party favor all the children got to take home a paint bucket. I spray painted old formula tins (milk powder tins) and my brother drilled some holes for the handles, great recycling again. Inside the paint tins was some stickers, cute colouring sheets from made by joel, a big chalk and tiny watercolours that I brought back from Finland. Cute ay?


Happy 3rd birthday my darling baby girl!

Saturday, 20 July 2013

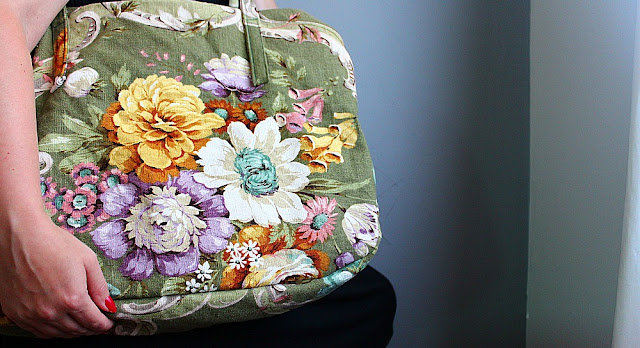
Retro bag just for me


My grandmum had these very funky outdoor chairs when I was still living in Finland and I then already told her that when those chairs broke I would want the fabric from them. And now after few years, that fabric was waiting for me there and the chairs had a new coat of more modern material.


I was holding the material in my hands, thinking of what I should make of it. I have so many fabrics at home that I haven't made into anything because they are too precious, I didn't want this to join that pile. Then my dear husband came and said he wanted to sew something of it for me. Can you imagine!


Thanks hubby, I LOVE my new retro bag! And I don't know how he did it, but I love the size of this bag. I want to make more now with these measurements. It's perfect.


Monday, 7 January 2013

My big bag


Yeah BOY, I finally got some inspiration to sew. I found this fabric on the top shelf in one of the cupboards when we moved in. It had been something, yeah something, I have no idea what. But that instance when I saw it, I fell in love with it and wanted to make a big bag out of it. Almost two years later I have done it! It must be the year of miracles. I LOVE it! I just made the handles too long, so I gotta look into fixing that at some stage, maybe in two years time. I have enough materials to make another one too, so I might just do that.

I have lately been doing bets with myself, and I wanted to see how much things I could fit in it. This is how it works: I bet I can't fit shoes for our whole family in that bag. I bet I can't fit all of my kids dublos in that bag. Etc.

Oh yes I can!
Oh yes I can!


Friday, 9 November 2012

Book lover's bag


I feel like we live in a world where everything needs to be new and fancy. I often clash with this type of world as I have been raised to reuse and recycle, to save and to share. Because of that disagreement, I find myself making things that are recycled to the max.

This project is rycycling at it's best, a bag made out of an old book. I saw this on Pinterest and decided to try it. I think they are pretty funky.


All together there were three different ones (one of them is already sold), and I think I'll be making more of these.


Wednesday, 31 October 2012

Spring Festival hulabaloo


Hey ya'll! I haven't been posting much lately, not because I would have been relaxing with our little prince, but because I've been busy busy sewing. Couple of weeks ago I tossed an idea to my mum of going to the Narrogin Spring Festival. She loved the idea and that was the start of two weeks of madness in our house.

For two weeks all the tables in this house were covered in fabric. I don't know where we ate.. Did we eat at all? No recollection on that one. We lost 3 pairs of scissors in that madness and had to buy one new pair (two of the scissors have since been found again). We got a new, though second hand, sewing machine to help us out so we could both be sewing at the same time (thank you hubby for that). We started as soon as we woke up and didn't finish until our eyes were closing in on us. We sew without thread (so tired), sang kids songs and had a blast.


 The day was amazing! So many friendly faces and so many lovely comments and of course some sales too. We had reversible dresses, reversible hats (for girls and boys), reversible headbands, nappy wallets, travel drawing kits, animal masks, bags, shorts for boys, dresses for girls, hair clips.

Most of the products were made (at least partly) from recycled materials, old curtains, sheets and such. Very nice I say.


My favorites were the animal masks and the boys pants that have the funky pockets. Gotta keep couple of them for Noah I think. People loved the reversable hats and the travel drawing kits as I sold most of them. Also the animal masks and the dresses got a lot of attention during the day.


Noah was hanging out with me all day and did so well. Many people were asking if I'm on facebook, so as of yesterday, you can see a button on the right collumn of this blog. Click that and you find me on facebook! Yay!


Thanks mum for going insane with me over the two last weeks and for helping me out. You are the best!

Friday, 12 October 2012

Something pinned

 
Anybody out there who loves Pinterest? Wohoo, I see most of you have your hands up. I've been collecting some inspiring things there and now it was finally time to try something. Yes, I made something I pinned on Pinterest!

You might have pinned it yourself, or seen it there anyway. If you haven't, go and check HERE. I've had heaps of old doilies in various boxes and now I finally felt like I had the time to put them together. I'm pleased.

Have you made anything you've pinned?


Wednesday, 26 September 2012

Told ya there would be pants


Didn't I promise pants? I was going through all the baby clothes we were given and there were literally no pants.Yes, this still unborn child didn't have any pants. So mum and I started a production line. She did the cutting, I did the sewing. Materials are old linen and mens shirts. The same materials I used to make these buntings HERE, so very well recycled. I think we'll make a few more of these after we've tried them on the baby. I call them groovy clown pants.

Saturday, 15 September 2012

Cpr for an apron

One of the latest finds from our little op shop was this cute apron. Well, the only cute thing about it was the materil. I do not understand the point of these half aprons. I, at least, get all the flour and dough on my shirt so why would I want an apron that covers my pants? Oh well, the material was too cute to leave it there. I think I paid 50 cents for it.


As I looked at the apron closer, I realised that it was handmade. Oh how could I make something new out of it knowing that someone had created this apron with their own two little crafty hands. I felt like I was taking away it's life, and that is just too brutal. All this old apron needed was a bit of cpr. I had to keep it's original purpose alive. I just modified it a little bit and made it into an apron for my little helper in the kitchen.


She loves to "mix, mix, mix", as she says herself, and it does get a bit messy everytime. So she really did need an apron. I'm thinking of wrapping this as a Christmas present though. I think it would be perfect as that. First Christmas present of the year, done!


Sunday, 2 September 2012

I want to be like daddy - dress


It is Father's day in Australia and it is needless to say (but I'm going to say it anyway) that our little girl is her father's biggest fan. Last night we made him a card, we made him a goodie bag for work with all his favorite treats (as he had to work today) and wrapped the presents. Then after daddy's little girl was fast asleep, I thought what next? And so this super easy and quick I want to be like daddy - dress was born.

I thought, how nice would it be for her to prance around all Father's day wearing a dress that is made of daddy's old shirt! Perfect way to also recycle a shirt that he isn't going wearing anymore. And daddy thought she looked super duper cute.

Here's a how to picture:


1. As you can see, I used her other dress to get the right size. First thing is to cut it the right length.

2. Then cut the sides and the arm holes. I wanted this dress to be a sleeveless. Remember to leave about 1cm-2cm seam allowance.

3. Finish the arm holes. I just used an overlocker, because I was lazy and wanted to finish the dress quick. Then sew the sides together, remember to have the right sides together. And lastly finish the hem. Again I just went around with my overlocker.

That is it! How easy and quick was that!?? Well I did make a belt for the dress too which took a bit more time, but that's a totally different tutorial. You could just use an already existing belt or not wear a belt at all, looks cute that way too!


Related Posts with Thumbnails