Yes mothers day has come and gone, but I haven't had any time to share what we made with Emma for the women in our lives. I had a great vision of Emma pressing her fingerprints into heart shapes. So here's our idea that you can do with your kids for any occasion! We are sending these out as birthday presents and Christmas presents too, so not just Mothers day presents. Actually they would be great for Valentines day too (thinking ahead is always a good thing).
Turns out Emma is still a bit too young to make heart shapes with fingers. We did try and managed to do five hearts like that. Then I decided to do a stamp out of a piece of cardboard and that was easier and quicker for her to do. So I've put together a little tutorial of how to make these lovelies.
You get the idea from the pictures, but I've added a few lines of extra insight if you want to read them too.
What you need is:
- some light coloured material
- fabric paint
- a cap of a bottle to draw a circle (and a pencil of course)
- some felt
- fray stop (optional)
- cardboard for a stamp if you want to use a stamp
- scissors
- hot glue gun
- sewing machine
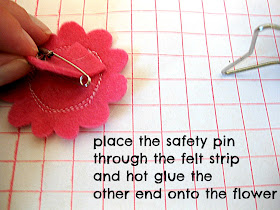
- safety pins
First of draw some circles on your material. This helps your child to know where the hearts need to be and will save you a lot of material since they won't be making them randomly all over the place. It'll also help you to cut the hearts out in a circle shape, dah!
If you want to use a stamp instead, you could cut out a heart shape straight away. I wanted to make it a bit more challenging for Emma so I made a rain drop shape and she had to stamp twise to get the heart shape. I did have to help her out with the other half of the heart but it was fun doing it together.
I placed the stamp I made of cardboard on top of a pen with double sided sticky tape.
Once the hearts are dry, you can just cut out the circles of the material.
You can make a patern for the flowers if you want them all to be the same shape.
My material was fraying a lot so I used a fray stop around the edges of the circle. It's awesome stuff and helps out a lot in small projects like these. After applying fray stop around the edges it was easier to sew the circle on the flower.
Now I know that all you people in Finland won't find fray stop in the shops. I've tried and the sales people haven't had a clue of what I've been talking about. So the best way is to order online if you want some. And in Australia, you can buy these in almost any craft/material shop.
I sewed around the circle twise.
It depends on how old your child is, but obsiously the older they get the more they can do themselves. Cutting the flower, and even sewing is not a problem for older children. But even though my kiddo was only able to do the hearts and even in them she needed help, I'm still writing in the cards that it's made by Emma.
Here's still the ones with the finger print hearts:
How cute are they! A little piece of love for someone special.


Suloisia!
ReplyDeleteKiitos, munkin mielestä aika söpöjä.
DeleteKaunis ajatus noissa takana :))
ReplyDeleteKiitän, toivottavasti myös saajat tykkäävät. :)
Delete